How to upgrade your graphics card cooling in a multi GPU setup (Mining)

Hello there folks.

I have been busy recently cutting my teeth on getting to grip with crypto-currency mining. Many people have heard of Bitcoin, but there are also many other coins you can mine see link for the top 100: https://coinmarketcap.com/ . Personally I am Mining Vertcoin, which can only be mined using GPU / CPU and are ASIC resistant. If there is any interest I might put a blog up on how to setup the software for mining, we shall see…

Anyway, if you are mining or using Crossfire of SLI, you will probably run into the problem that in your standard case two fof the PCI express slots (used for GPUs) are next to each other, this means that the one of the cards will more than likely overheat or least run hotter than  they could run. In this vein a recent advert for “mega miners” caused me to raise my eyebrows slightly: https://www.cyberpowersystem.co.uk/landingpages/megaminerpc/

As you can see from that link two of the cards are right next to each other – not ideal.

This is exactly what happened to me when I decided to build a dedicated mining computer – or mining rig as they are known – One of my cards was getting too hot!

Mining rigs are designed to run 24/7 and with the GPU maxed out at all times. This obviously causing the card to generate a lot of heat. Heat is not especially a problem for modern graphics cards, however you should try and keep cards at 75 deg C or lower if possible. My card however was approaching closer to 90 deg C

Whilst constructing my mining rig I was trying to keep things as simple as possible to keep the costs down low, but also so I can use my computer normally if mining Vertcoins didn’t work out. To that end I didnt want to go down the water cooling route but instead got a case with massive amount of air-cooling. Enter the coolermaster HAF-X.

HAFX

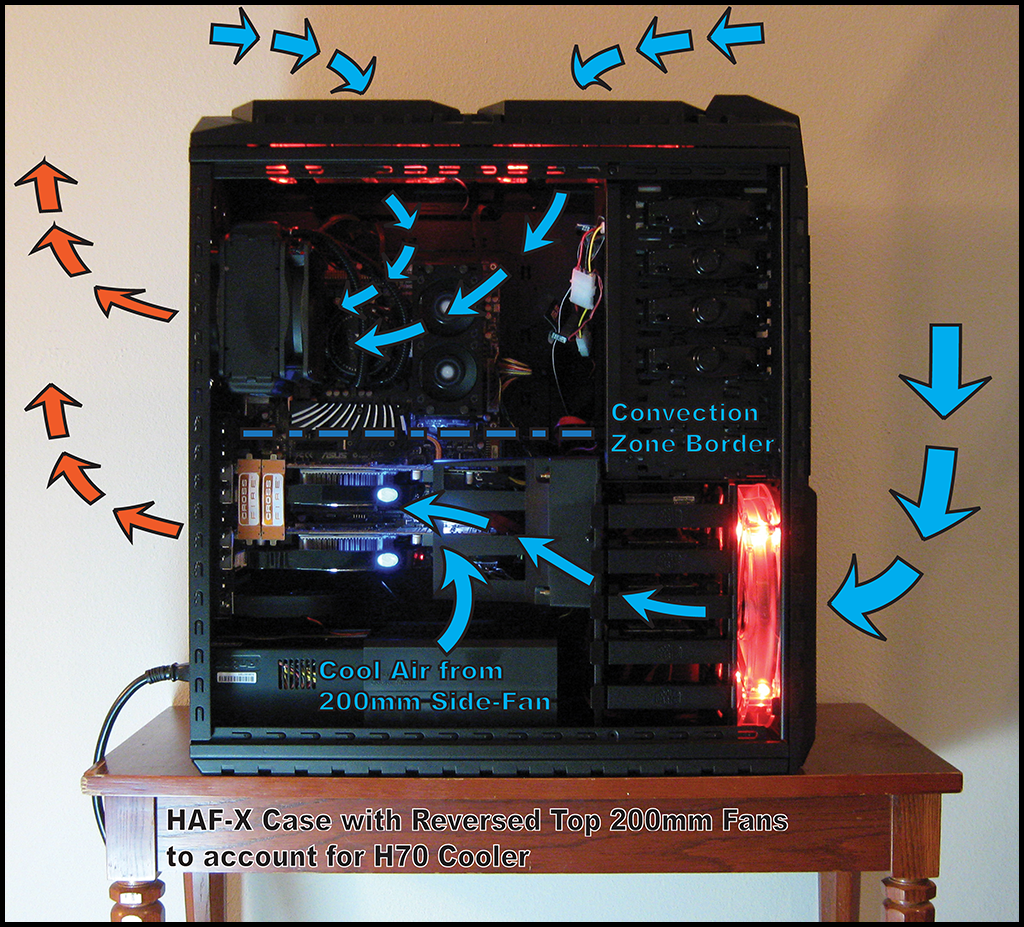
This case is big, and even comes with wheels you can attach to the bottom. This also gives forth to other advantages such as the ability to raise one card up slightly higher in order to increase air flow. And that is exactly what I did.

Please note that not all cases are as generous in size and may not allow you to rasie your card up and still has the side panel on, however if you don’t mind having the side panel off, it will work for pretty much any case.

Problem:

One graphics is overheating because it is next to another one.

Solution:

Raise one card up slightly higher in order to increase air flow.

So as this is a hardware tutorial instead of a software tutorila I will give you a list of equipment needed, exactly what I used for a 2 slot graphics card (MSI R9 270):

1). 2 x 35mm Brass Hex Standoff Pillar Male (Standoff)

2). 2 x 40mm Brass Hex Standoff Pillar Male (doesn’t necessarily need to be 40mm – you can use – Standoff )

3). 2 x 3mm Nuts

Link: http://www.ebay.co.uk/itm/221352218844?var=520225084905&ssPageName=STRK:MEWNX:IT&_trksid=p3984.m1439.l2649

20140413_091855sm

4). 2 x PCI-E Express 16X Protector Extender Extension Riser Card Adapter (Riser)

20140413_104026sm

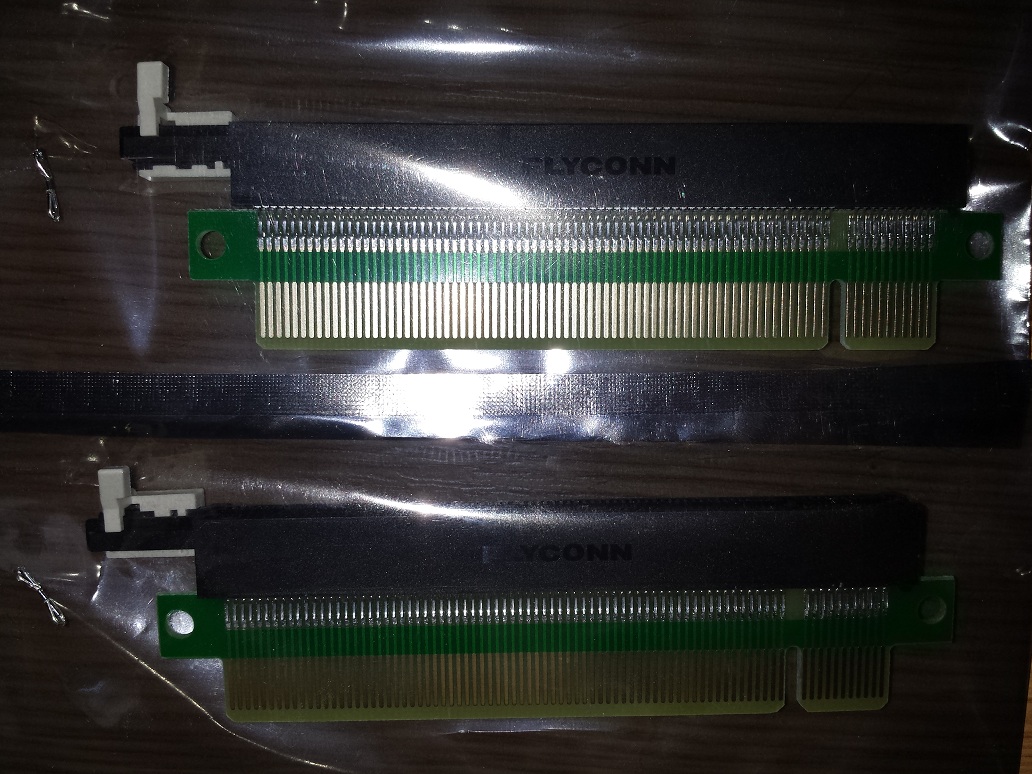
Link: http://www.ebay.co.uk/itm/200928681722?ssPageName=STRK:MEWNX:IT&_trksid=p3984.m1439.l2649

5). 2 x Case screws

6). 4 x Small washer

The total cost of this should be no more than £15

Now comes the fun part.

I have done all the measurements necessary to make sure this all works, however I urge you to check your own setup in case there is an anomaly.

The first thing you need to know is that you are going to put one riser card into the other this will effectively raise up the graphics card by 38mm. This is important because one 35mm standoff is not high enough you need to add a nut to make it 38mm.

The first thing to do is attach the two 35mm standoff to the case by placing them on top of the expansion slot(s) you wish to raise them up on and then put one of the nuts underneath it. This is necessary to raise height of the expansion slot by 38mm.

Next you put the graphics card into the two connected riser cards. Next you can insert the graphics card and riser card combo into the PCI express slot where you want to raise the card up.

After that you will need to use the 4 washers; one for either side of the graphics card screw holes to hold it in place firmly. Then use the 40mm Standoffs to screw in over the top.

Once this is done you should see something like this:

20140407_225153sm 20140407_225207sm 20140407_225214sm

Next you can add in your other graphics cards and you can immediately see the benefit of doing this:

20140402_231102sm

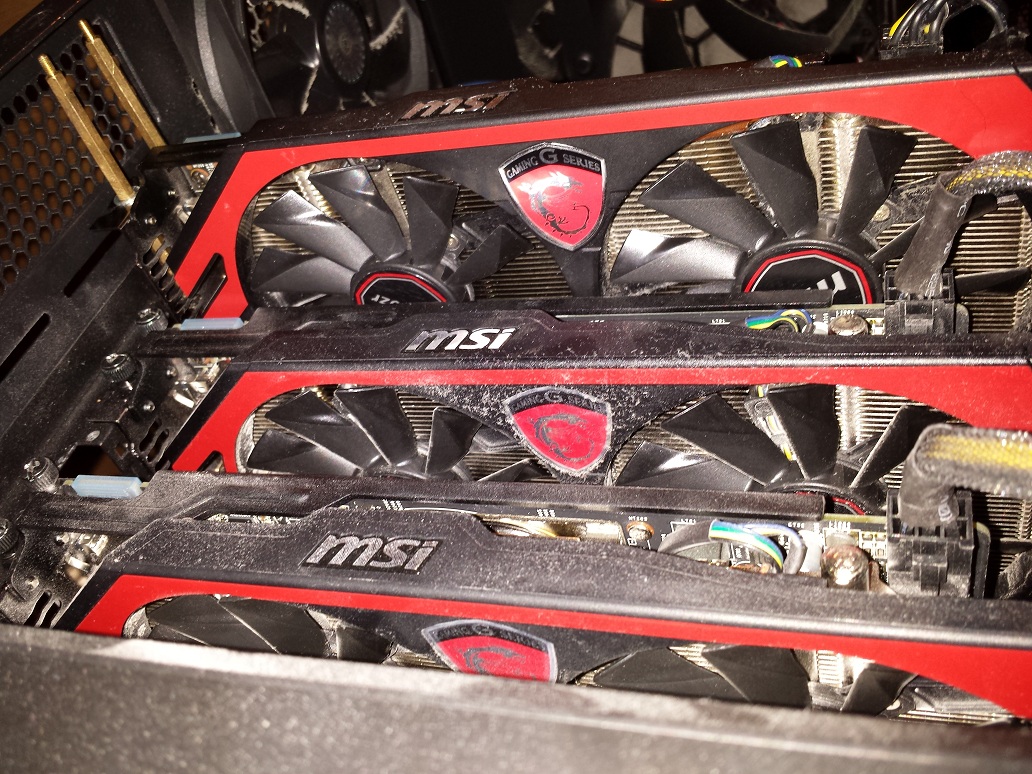
As for me my card now runs consistently under 75 deg C. Happy Days!

Hope this helps / inspires someone – also use these iunstructions at your own risk! (but it did work for me!)

-ThePcMechanic

Posted in Advice | 2 Comments

Alternative method to activate Microsoft Office 2010

Hello,

Recently I had a problem activating a recently installed version of Microsoft Office 2010. The error was “0x80070190”.

This was fixed with a command line solution.

Problem:

Microsoft Office 2010 activation error.

Solution:

Firstly you should try and activate Office 2010 the standard way:

Firstly open Word/File and select Help

activating_step2

Next select “Change product key” and fill in the licence key information

activating_step3

Although the activation will fail the key information will be stored.

Next you have two options:

Option 1:

Activate Office 2010 by using OSPP.VBS.

Step one: Open an administrative command-prompt
Step two: Run the script OSPP.VBS (Office Software Protection Platform – Visual Basic Script)

32-bit Windows version should use the command:

cscript “C:\Program Files\Microsoft Office\Office14\OSPP.VBS”
64-bit Windows version should use the command

“C:\Program Files (x86)\Microsoft Office\Office14\OSPP.VBS”

You should then get the following:

command activation

Congratulation Microsoft office is now activated.

Option 2:

Open Word as Administrator:

Step one: Go to Start / All Programs / Microsoft Office

Step two: Hold down the ‘Shift’ key and right-click word and select “Run as administrator”

Step three: Follow the prompts to internet activate

This may work for you.

Feel free to comment below if you have any further ways to activate Microsoft office.

*Please note: This error can be more prevalent on a Office installation that has been restored from an image.

Until next time!

-ThePcMechanic

Posted in Advice | Leave a comment

How to update Windows XP from a brand new installation using Windows Updates

Hello everyone,

I have been away for while, moving house, moving job etc, but hopefully I will be updating this blog regularly again.

Recently I had wanted to build a media center for my lounge, and as luck would have it I had an old HP DV6000 series PC that was just right for the job. Unfortunately the screen was broken, however my parents had another DV6000 series PC with a broken motherboard, but working screen, so a quick screen swap later I was ready to install / repair install Windows XP Media center edition (2005)

Problem:

Windows will not update using Windows Update.

Solution:

The first thing to update is the Service pack versions for XP. If you are installing XP with no service pack then you will need to start with SP2 (Service pack) found here:

Service Pack 2 (2004):

http://www.microsoft.com/en-us/download/details.aspx?id=28

Once installed you will need to install the next Service Pack.

Service Pack 3 (2008):

http://www.microsoft.com/en-us/download/details.aspx?id=24

You should now be able to run your windows updates.

Problem

Windows Update will still not work.

Solution(s)

Solution 1

The first thing to try is updating internet explorer to the latest version for XP (IE8):

https://www.microsoft.com/en-gb/download/internet-explorer-8-details.aspx

Solution 2

Make sure the following services are running in XP:

  • Automatic Updates
  • Background Intelligent Transfer Service
  • Cryptographic Services
  • Event Log
  • Remote Procedure Call (RPC)
  • Windows Update

You can find services by right clicking on Start/Control Panel/Administrative Tools/Services

Services

If you find they are not running, just right click the service and select ‘start’. This should start the service.

Solution 3

If this is still not working then you can try re-registering components that allow windows updates to work. To re-register a component in this case DLL’s (Dynamic-link library) open the command prompt by going to: Start/All Programs/Accessories/command prompt

Inside the command prompt type, or copy and paste the commands below:

regsvr32.exe regwizc.dll
regsvr32.exe Mssip32.dll
regsvr32.exe Wintrust.dll
regsvr32.exe Softpub.dll
regsvr32.exe Initpki.dll
regsvr32.exe Dssenh.dll
regsvr32.exe Rsaenh.dll
regsvr32.exe Gpkcsp.dll
regsvr32.exe Slbcsp.dll
regsvr32.exe Cryptdlg.dll
regsvr32.exe licdll.dll
regsvr32.exe Sccbase.dll
regsvr32.exe Msxml.dll
regsvr32.exe Msxml2.dll
regsvr32.exe Msxml3.dll
regsvr32.exe wuweb.dll
regsvr32.exe wups2.dll
regsvr32.exe wups.dll
regsvr32.exe wucltui.dll
regsvr32.exe wuaueng1.dll
regsvr32.exe wuaueng.dll
regsvr32.exe wuapi.dll

If this doesn’t work then you may have to rely on the ‘Automatic Updates’ section of Windows XP. To find out what is happening with windows updates you can look at the log file: %windir%\Windowsupdate.log for example c:\windows\Windowsupdatelog.

In here it will show you when when windows update (Manual update) and automatic updates are launched. You can see the difference with the updates as:

** START **  Agent: Finding updates [CallerId = AutomaticUpdates]

** START **  Agent: Finding updates [CallerId = WindowsUpdates]

For me manual ‘WindowsUpdates’ were failing but ‘AutomaticUpdates’ were fine, you just had to be patient with the automatic download. You can change the settings for windows updates by going to: Control Panel/Automatic Updates – I suggest changing it to “Download updates updates for me, but let me choose when to install them, or use Automatic and set it for a time about 2 minutes ahead of the current time on the computer (make sure the time is correct on the machine!)

automatic updates

For more information on reading the log file see:  http://support.microsoft.com/kb/902093

Misc Fixes

Other suggestions involve installing the Microsoft genuine advantage tool, you may wish to try this if all else fails:

http://www.microsoft.com/en-gb/download/details.aspx?id=20888

Hopefully this helps someone, although I realise Microsoft is about to withdraw support for Windows XP on 8th April, 2014!

Hasta pronto!

-ThePcMechanic!

Posted in How to guides | Leave a comment

Spam

Hi All!

I am still here! Firstly apologies if I havn’t replied to your messages in a timely fashion  the site was getting a lot of spam, so I have removed it, so it is possible that genuine messages have been deleted, sorry about that.

If you have any questions, please don’t hesitate to contact me and I will will reply as soon as I can.

Take care,

-ThePcMechanic

Posted in Advice | 4 Comments

How to recover files and data from a faulty hard drive

Greetings!

Following on from my post about how to replace a laptop hard disk, this post focuses on data recovery from a faulty hard disk.

Firstly the reason the laptop hard drive failed on my flat-mates laptop was because  it was overheating. This was a combination of dust inside the case, vista being a bit heavy and some undetected viruses on the machine. So to save yourself issues, if you notice you laptop/desktop getting hot or over heating, make sure that it is free from viruses and give the insides a clean!

I cannot guarantee that using the method descibed below will recover lost data on a hard disk, as hard drives can break down in many different ways, however it did work for me, so it may do for you.

Problem:

Hard disk is faulty and cannot be read correctly.

Symptoms:

The disk I recovered data from wouldn’t get past a certain part in the boot-up sequence. I removed the disk from the machine found it to be a SATA drive.  Interestingly if you have a 3.5 inch disk caddy for a SATA disk drive, you may be able to conect a 2.5 inch laptop disk to it (which is what I did). The SATA and power connectors are the same.

After I removed the disk and put it in a caddy, windows reported that the disk couldn’t be read as it wasn’t formatted.

Solution:

After a bit of research and searching I came across two completely free tools that can help you recover data. They are made by the same people, or should I say person, Christophe Grenier at www.cgsecurity.org

The first one I tried was testdisk http://www.cgsecurity.org/wiki/TestDisk

Interface for Testdisk


It is designed to recover lost partitions. As you can see it doesn’t use a GUI (graphical user interface) instead it uses text commands. Its not too difficult once you get the hang of navigating it using just a keyboard and there is quite a lot of user support if you get stuck on the authors website, including a walk-through guide.

I tried it several times with different options without success. If it had been successful, I would have been able to read the disk as normal, so I had to try something else, plan B.

The second piece of software I tried was PhotoRechttp://www.cgsecurity.org/wiki/PhotoRec

Another text based user interface program!

This software doesn’t worry about partitions it just looks at the data blocks and clusters on the disk. The upshot of this is that you can recover any data on a disk if the partition table is missing, as long as the drive is not physically damaged in such a way that makes the disk unreadable. This includes previously deleted files and files from a drive that has been re-formatted.

After going through some of the options in the program, you can choose which type of files you want to recover:

Choose the file type(s) to recover

This is extremely useful, as instead of recovering all the data from the disk, you can just recover certain files such as picture/photo files including bmp and jpg files. Of course you can still recover the whole disk if you want to.

The one downside of recovering all of this data is the original file name will be lost. So if you had a some photos and one of them was called, ‘midnight in paris.jpg’ this information will be lost and instead you will get a list files that looks like this:

crytpic file names

This means you will have to go through the results find the photos you want and rename them with a more suitable name. But at least you get your files back!

It was this second method that enabled me to recover my flat-mates files and make him a very happy chappy indeed.

Just make sure you have an up to date anti-virus when you recover old data from someone else’s disk!

Final word

PhotoRec is a very powerful tool and enables you you recover data from damaged disks. This is not its limit though because it can also recover data from CD-ROM’s and memory cards such as SD and MMC. It also runs on many operating systems:

  • DOS/Win9x
  • Windows NT 4/2000/XP/2003/Vista/2008/7
  • Linux
  • FreeBSD, NetBSD, OpenBSD
  • Sun Solaris
  • Mac OS X

And can recover data from multiple file formats:

  • FAT,
  • NTFS,
  • EXT2/EXT3 filesystem
  • HFS+

Untill next time!

Posted in How to guides | 1 Comment

How to replace a hard drive on a laptop (sata)

A while back my flat-mate’s laptop hard drive keeled over and died. It wouldn’t boot and wouldn’t read in a caddy, and as there was no back of the data, it was all lost too. Only one thing for it then, buy and install a brand new hard disk.
In this tutorial, I will show you how to physically replace the hard disk, I won’t be showing you how to install windows now and there are many other blogs that cover that.
Hopefully this will give you the confidence to go ahead and replace a disk is you need to.
.
Problem
.
How to replace hard disk (sata)
.
Solution

  • First of all you will need to switch off the laptop, and remove the power connection.
  • Now turn the laptop over and remove the battery.
  • You should now see something like this:

Step 1

  • You should be able to locate the hard disk cover it usually has a symbol on it that looks like this:

Hard drive symbol

  • Near the symbol(s) you should find the hard disk cover screws remove them and you will see something like this:

Step 2

  • In this case the hard disk is housed in some casing, the screws keeping it attached to the laptop case need removing and then you can slide the hard disk out.

Step 3

  • Next you need to remove the casing screws on the hard disk.


Step 4

  • Finally the hard disk has been removed from it’s casing.
  • All that remains is to place the new hard disk back into the casing and reverse the whole process!

Please note hard disks and other computer parts are static-sensitive, meaning you should ensure you discarge any staic you have. You can do this by touching something metal, before you start this will remove any static build up.

Posted in How to guides | Leave a comment

How to block someone on facebook chat / sidebar / IM

Greetings!

Now there may a time when you don’t wish to be seen or contacted but people on facebook chat – or sidebar.

Problem:

To go offline to certain members

Solution:

Firstly you need to access the lists you have on facebook. So go to your homepage and choose lists on the left and click on more. This will open up a new page. On this page you can create a new list, so go ahead and select create a list, and call in Chat blocked or whatever you wish.

Next add the people you want to be on your new list.

After your list is created you will need to open up your side bar and click on the configuration, it is shaped like a cog:

Chat availability

Now select Limit Availbility and you will see this screen:

Next simply select the lists you want to be available to chat to, and the rest will be blocked!

This doesn’t affect you receiving updates in your home feed.

Enjoy!


Posted in How to guides | Leave a comment

How to get the Belkin Nostromo N50 to work with Windows 7 and Windows 8

Hello All,

I have been away for 2 weeks, hence the lack in blog updates. But don’t fear I’m back now and will be blogging regularly as usual.

Along with my old webcam which previously featured, I have a similarly old gaming device, the Belkin Nostromo N50.

Gaming device, more comfortable to use.

The Nostromo N50 is a HID (Human Interface Device) in the same way as gamepads. Unfortnately there wasn’t a Vista driver released for this, however, you can get it to work with a bit of tinkering.

Problem:

Can’t get Nostromo N50 to work in Windows 7

Solution:

1. Go to the Belkin website and download and install the latest Windows 7 drivers for the Belkin Nostromo N52 found here:

http://en-uk-support.belkin.com/app/answers/detail/a_id/2059

Once installed you will need to edit your registry. Registry editing can be tricky, so make sure you back up your registry first:

2. Click start, in the search box type “regedit” then press enter. This will load the registry editor.

To backup the registry select file and export. Name the file as you wish and save it. Now you are safe to edit your registry, as you have made a back up copy.

3. Next click through the folders on the left hand side of the registry editor. The path should be:

HKEY_CURRENT_USER/System/CurrentControlSet/Control/MediaProperties/….

….PrivateProperties/Joystick/OEM/VID_050D&PID_0805


Registry editor


Once you get to the entry right click “OEMname” and select modify, then rename it exactly as “Nostromo n50 Speedpad”. If you don’t spell it correctly it will not work.

It is possible it will be in a slightly different directory. If you can’t immediately find it check each enrty in the OEM folder and you will find it. The VID and PID should be the same: “VID_050D&PID_0805”.

4. Close the registry editor and it should now work. You may need to restart.

Until next time…

**Update this also works for Windows 8.1***


Posted in How to guides | 24 Comments

How to customise new tabs in Google chrome

Hi folks,

Quite a short one this week. For while it annoyed me that when you opened a new tab in Google chrome, you were not able to set it to a page, as you can with your homepage.

After a little searching I came across this:

New Tab Redirect!

https://chrome.google.com/webstore/detail/icpgjfneehieebagbmdbhnlpiopdcmna

This extension to chrome allows you to set the page on new tabs, great!

So here is how to install it.

  • Go to the main page (click on the link above)
  • Click add to chrome

Main page

  • When prompted click install
  • This adds the extension to chrome

Now all you need to do is edit the options to set the tab to open a specific webpage:

  • Click on the spanner top right in chrome

How to find extensions in google

  • Next select tools, and then extentions
  • Finally select options under New Tab Redirect!
  • You can then type any website you wish to open in the new tab for example www.google.com

New tab page options
  • After entering the desired webpage, close the tab and the settings are saved
  • Test it!

Any issues or for further info go to:

https://github.com/jimschubert/NewTab-Redirect/wiki

I hope this comes in useful for you!


Posted in How to guides | Leave a comment

How to troubleshoot ADSL Randomly dropping out – Intermittent internet connection issue

Hello again, so I got Virgin media installed at my new home back in mid march, it wasn’t a smooth install. But that wasn’t the cause of the internet dropping out intermittently.

Problem:

Internet randomly drops out

Troubleshooting:

It could be a wiring issue. Now what do I mean by a wiring issue. Well when your telephone gets installed the line has already been connected at the exchange but not made live. Now depending on your provider a number of things could happen.

1. You already have a line connected to your house.

2. You don’t have a line and BT will run a cable and connect to the nearest telegraph pole.

3. You don’t have a line and Virgin will run a cable to your house.

External wiring

Any of the above connections could have faults, and if it is an external wiring fault, you will have to ring BT/Virgin/Other to run some tests on the line.

Internal wiring fault

However most problems are caused in the home and here are a few things you can try to fix your problem:

1. Check you have connected your ADSL filter. Normally a router will come with an ADSL filter. This essentially allows you to use a phone and internet simultaneously. If you don’t use a filter and plug your modem/router in directly, when the phone rings your internet will cut off. This also happens on outgoing calls.

Used to filter ADSL / voice trafic

2. Extension cables. Telephone extension cables are usually used becasuse there isn’t a phone socket close to where you cant to use your phone. Unfortuately these cables can get pulled around and damaged, so if you have any of those remove them as they may be causing a fault.

3. More phones means more potential problems. Having a lot of phones on a line can cause a few problems (such as phones not ringing) so you could try removing all phones from all the sockets, just leaving the modem/router connected to the main/master socket in the house. The master socket is located where the telephone line first comes into your house, usually in your front room or one of the downstairs rooms.

4. And lastly it could be an internal wiring fault in one of the sockets. This was the case for me. After checking the line with virgin they asked me to use the test socket in the master socket of the house, removing all other phones. The test socket is actually behind a plate on your telephone socket.

The following advice is taken from the BT website on locating the test socket:

——————————————————————————————-

  • If your main socket looks like this socket (with a horizontal bar across the front template).
  • main socket

  • Carefully unscrew the 2 small screws and the bottom half of the faceplate should slide out. On the right hand side is a test socket. This connects you directly to the telephone line and bypasses any extension wiring you may have.
  • main socket open

    Plug the corded telephone into the test socket as above. Check for the line ringing once and stopping or not ringing at all by making test calls.
    Note if your main socket does not have a horizontal bar across the front and looks like this:

    old style

    Do not unscrew the face plate

    ——————————————————————————————-

    When I opened the main socket in my house this is what it looked like. You can see the test socket with the ADSL filter connected for testing purposes.

    Master Telephone socket

    Solution:

    This picture above is actually a picture I have taken more recently; Originally the white wire was hanging loose on the connector plate. I had to borrow a telephone kroner tool from a friend to push the wire back into the right place as it was causing the fault.

    Krone tool

    Needless to say with the router connected directly to the test socket things worked fine and it was the socket installation that was faulty. The internet is much more stable now the wiring has been fixed!

    Other possible causes

    If you are using wireless the following could affect you:

    • Using the same wireless channel as a neighbour
    • Microwave oven
    • Fluorescent lights
    • Cordless phones
    • Bluetooth devices,
    • Wireless video cameras
    • Distance is too far from the wireless point
    • On a shared wireless system someone is “hogging” the bandwidth


    Posted in How to guides | Leave a comment